Jekyll2026-04-26T18:14:53+01:00http://emilyoreilly.co.uk/feed/index.xmlEmily O’Reilly ACRAccredited paper conservator working on prints, drawings, watercolours and photographs, for private clients and public collections.Emily O'ReillyPaper Conservation on YouTube2023-07-04T12:16:34+01:002023-07-04T12:16:34+01:00http://emilyoreilly.co.uk/2023/07/04/paper-conservation-on-youtubeEarlier this year I collaborated with Masters of Craft to produce a series of films showing some paper conservation treatments. Please take a look.
Thank you to my client, who allowed me to be filmed working on her objects — there will be more to follow, so watch this space. And thank you to Nick Skinner for excellent camera work and patience.
Filming conservation work in the studio, 2023
If you have any works on paper that need rescuing, please get in touch.
]]>Emily O'ReillyPart 2: The Conservation of the Naples Bed Hangings from National Trust Mount Stewart, Northern Ireland2022-06-30T14:41:43+01:002022-06-30T14:41:43+01:00http://emilyoreilly.co.uk/2022/06/30/part-2-the-conservation-of-the-naples-bed-hangings-from-national-trust-mount-stewart-northern-irelandRepairing the paper
I can't believe it is June already — I have been busy working on the curtains for over six months and have now repaired one of the two curtains, plus the outer and inner valance. I have been posting updates on Instagram, Twitter and Facebook, so if you would like to see more before-and-after images, take a look or start following me.
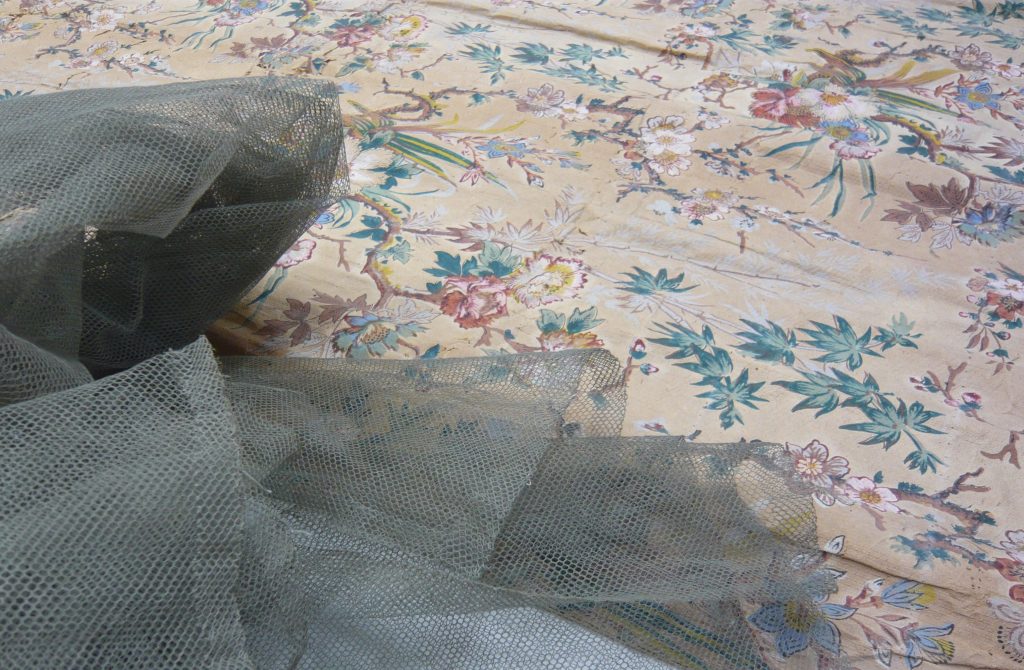
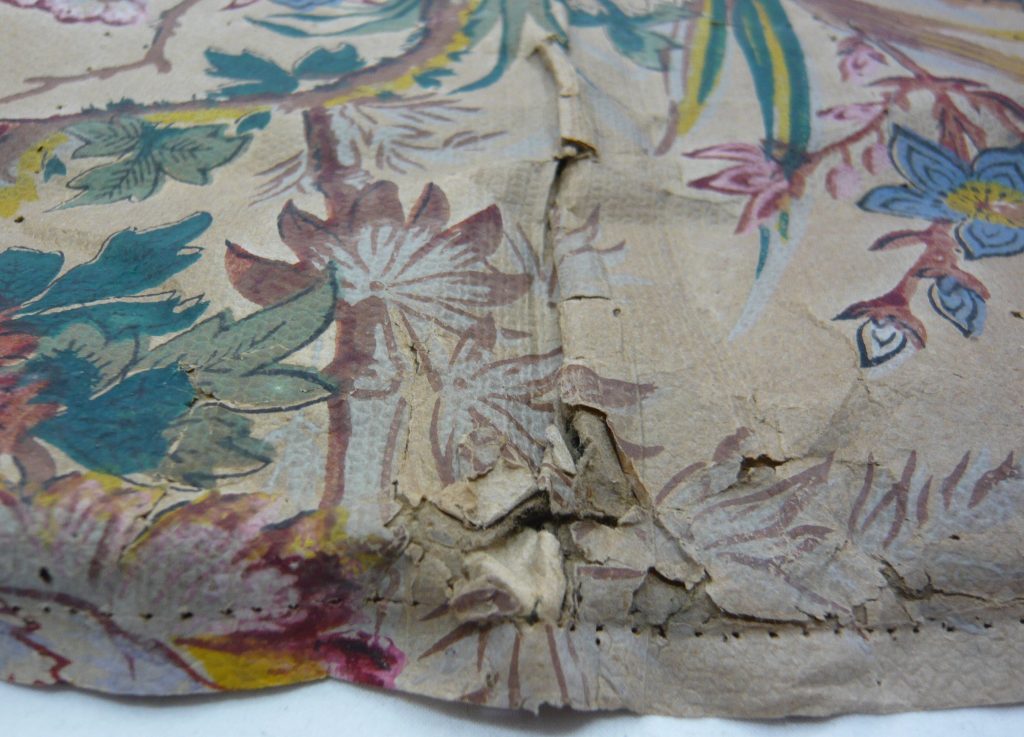
The net and silk linings have been removed to allow access to the paper, and to repair all the tears — and there were many tears to repair. Originally the curtains would have just been the paper; the net and silk linings were sewn on sometime in the middle of the 20th century to help protect the paper and hold it together — conservation, really.
The grey net removed from the curtain
Removing the net has revealed that the curtains have been folded up and stored for some time. The tears in the paper correspond closely to creases and folds still evident in the paper. There is the possibility that the curtains were bought and used, then folded and stored, and adapted in the 1930s into their current form around the single bed in the Naples bedroom. On the curtain in particular, you can see where they were handled to open and close: there are more tears, and the paper is more yellowed and discoloured in the centre of the edges — the yellowing caused by dirt and sweat from the hands.
The right-hand curtain folded over, showing the damage and the horizontal creases where it has been folded for some time
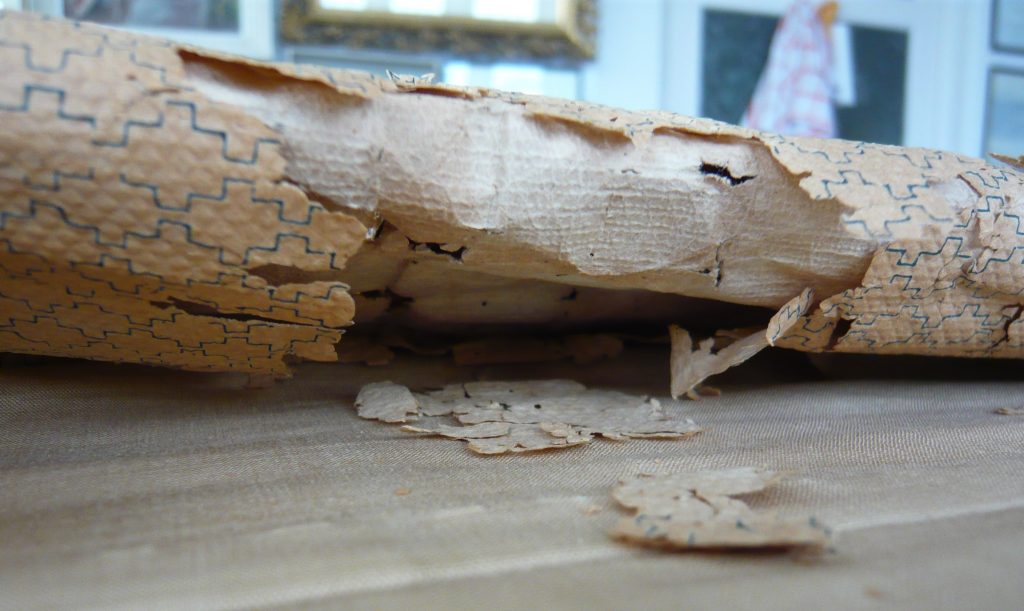
I had to test what was going to be the best material and method to use to repair the paper. In some areas the paper is so weak and crumbly that it is easily torn; without the net and the lining, the curtain was even more fragile, and there was no way it would take its own weight without them. There is also evidence the net and lining have done a good job of supporting the paper and holding the fragile layers together: there is no tearing or pulling from the stitches used to sew them on.
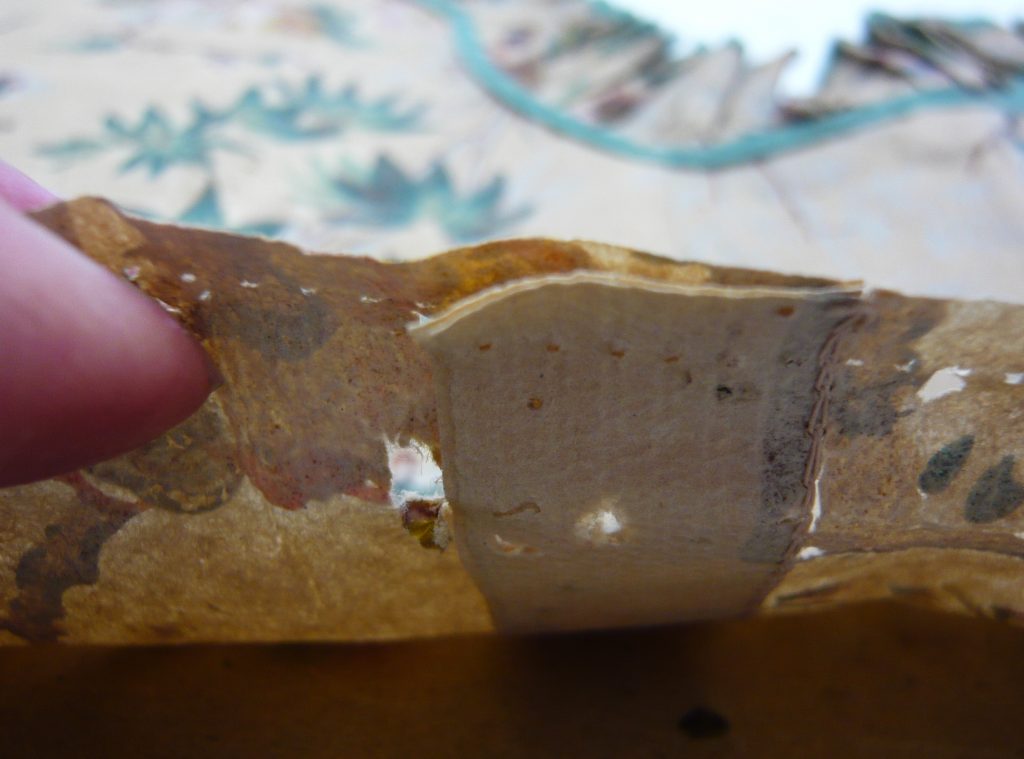
The fragility of the paper
Having thoroughly tested all options, I decided the best way to repair the layers of the paper was with a very fine tissue (only 5gsm), toned with inks and coated with an acrylic adhesive. The pre-made tissue was allowed to dry; strips were then cut to the size required for each tear, and the adhesive reactivated by warming with a heated spatula, sticking the repair tissue over the tear. Careful warming of the tissue on a soft felt layer beneath helped to retain the embossed pattern on the curtain paper.
Phedra mixing acrylic inks to the right shade to brush on to the thin tissue, making the repair paper
This method avoided using any moisture near the paper and allowed me to work quickly and efficiently — as there was rather a lot required.
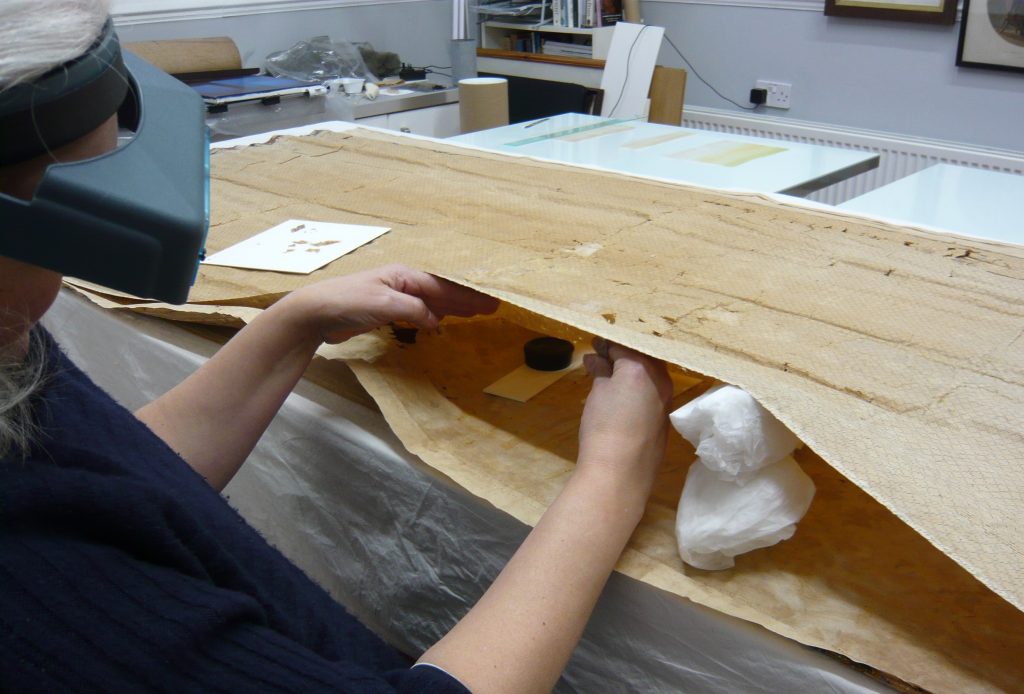
Having unpicked the hemmed paper layers, I am repairing the underside of the chintz-patterned paper.
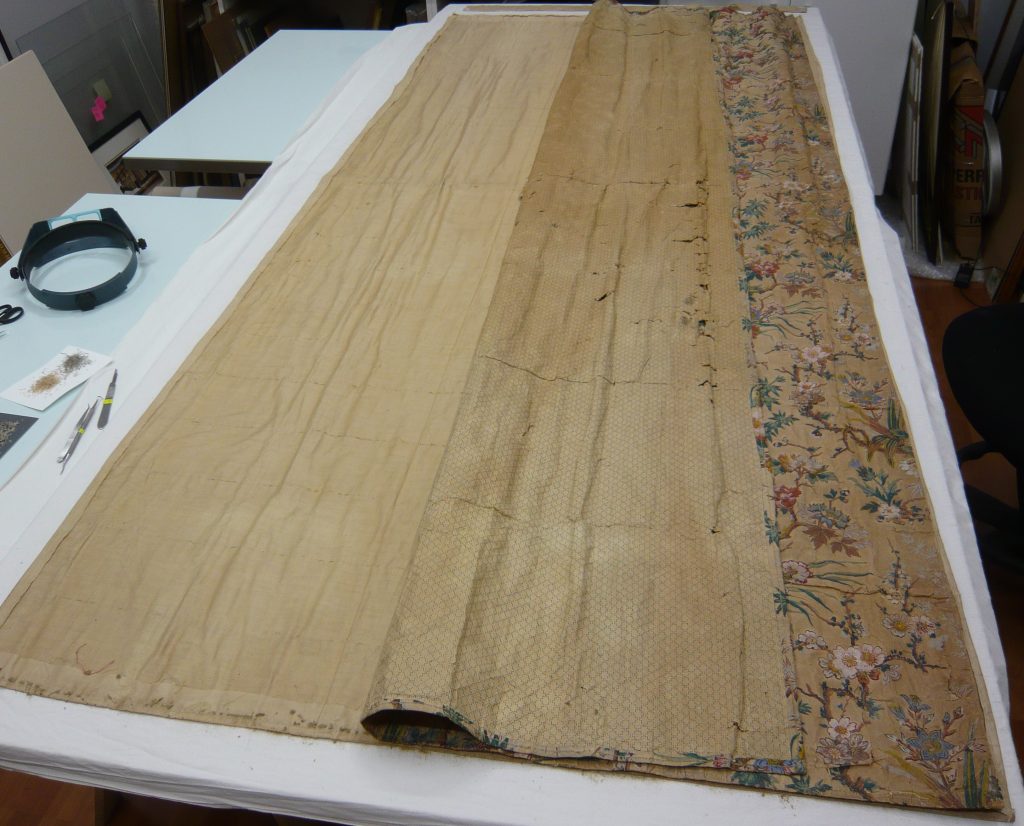
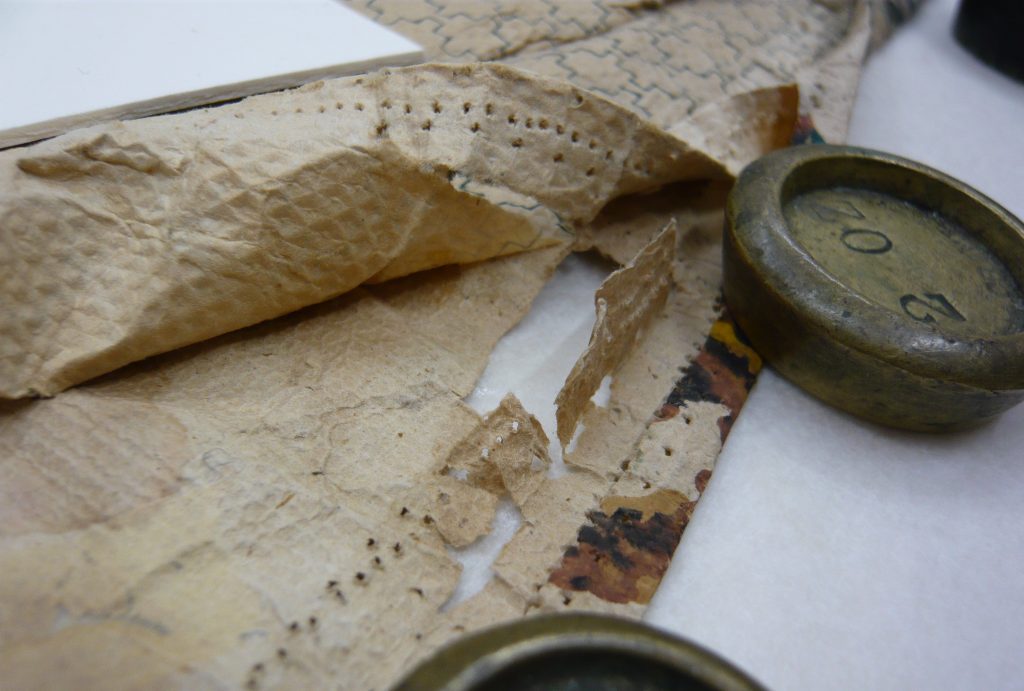
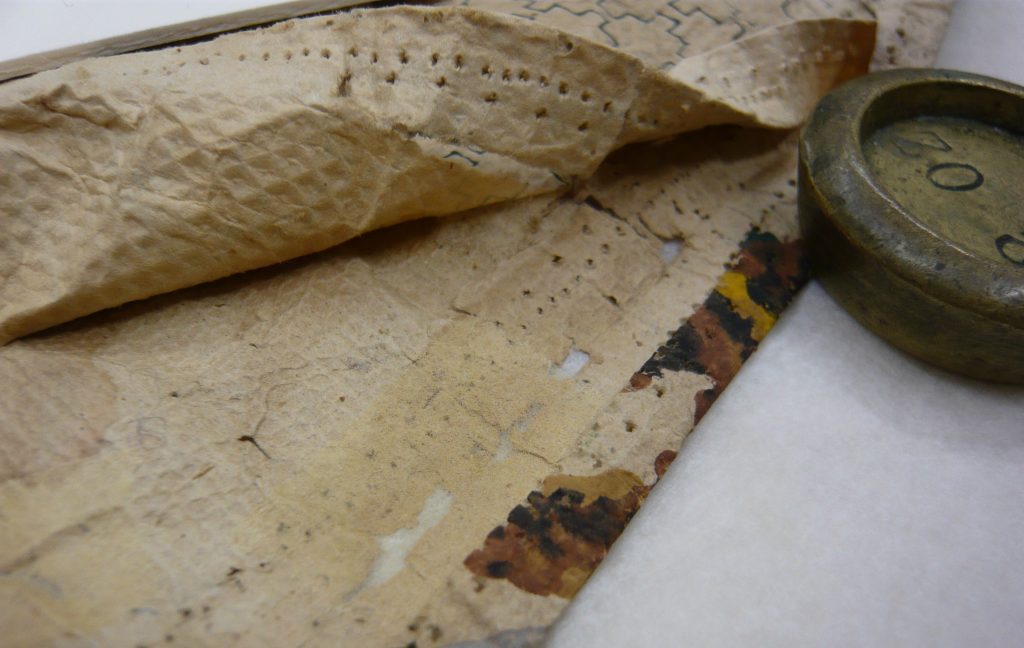
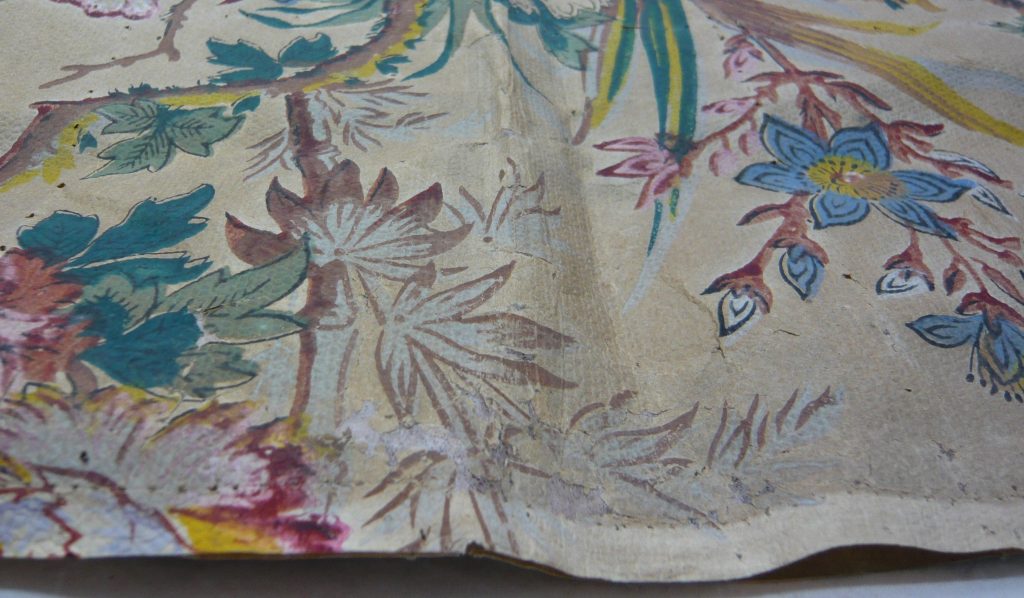
The curtains are made of two layers of paper: the chintz pattern and a geometric repeat pattern. (The valances had a thicker card between the two layers to stiffen the construction.) The two layers were hemmed together by machine stitching. Where a larger area of paper was needed, the paper was machine-stitched together. The paper was produced on a roll about 51cm wide — the width of average wallpaper.
How the chintz paper was joined together to create the larger size required
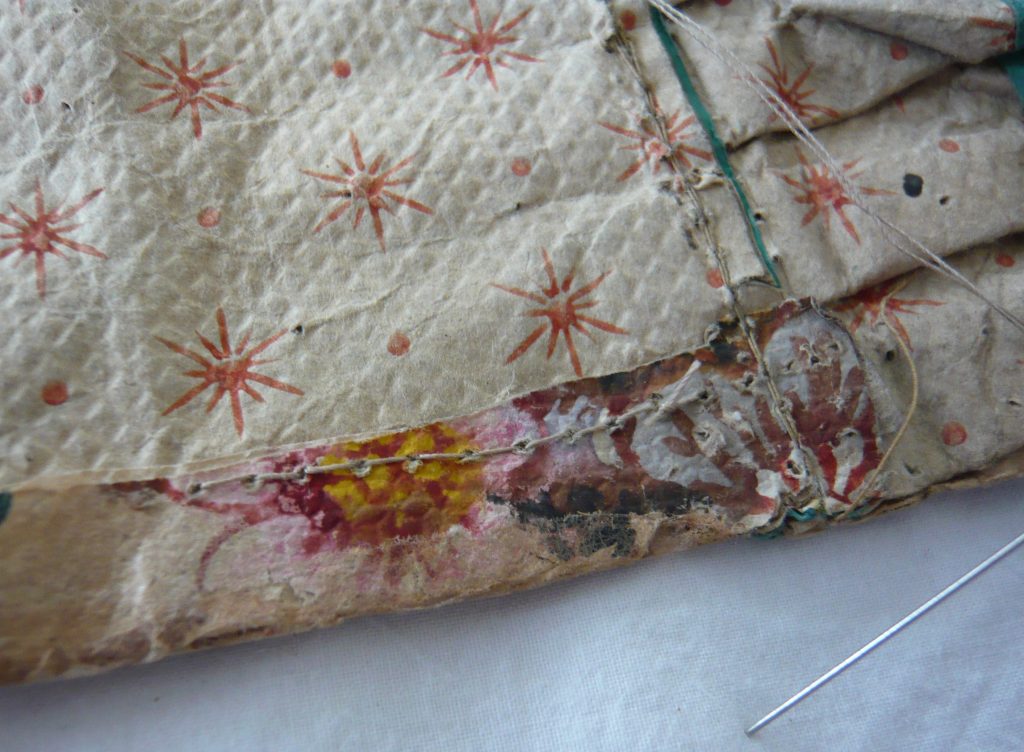
Where possible, I unpicked the hems of the paper and was able to repair the tears from the inside. This was not possible for every tear; some had to be repaired or reinforced on the front face. But because I had toned the paper in various shades to blend with the original, the repairs were virtually unnoticeable. The outside layer of paper on the hem needed to be repaired and reinforced, as it had worn through completely along much of its length.
Underside edge of paper before repair
The same area of paper after repair
It was not felt acceptable to thoroughly unstitch the curtains or valances, as this would have been very invasive and could have caused complications when trying to reconstruct.
Before repair
After repair
Before repair
After repair
Once repaired, the curtain was much easier to handle and now felt like a textile curtain rather than a lace one. The repair process has taken many hours to complete. Although I am a paper conservator, I have enjoyed developing my sewing skills. Although originally machine-stitched, there was no way I could have used a machine to hem the curtains back together, so the hems were hand-stitched after repair was completed, using the original sewing holes as much as possible.
Sewing the hem after repairing the paper
Many thanks to Phedra Komodromou, a student from Cardiff University, who assisted on this project and features in the images above.
]]>Emily O'ReillyPart 1: The Conservation of the Naples Bed Hangings from National Trust Mount Stewart, Northern Ireland2021-12-10T12:09:30+00:002021-12-10T12:09:30+00:00http://emilyoreilly.co.uk/2021/12/10/part-1-the-conservation-of-the-naples-bed-hangings-from-national-trust-mount-stewart-northern-irelandPlease watch the video to see and hear about what I have been up to in the studio the last few months. Work has begun on one of the curtains, removing the bobbinet and the linings to reveal a little more about how the curtains were made and the history of their use:
]]>Emily O'ReillyA new project — the Naples bed hangings2021-10-31T11:14:29+00:002021-10-31T11:14:29+00:00http://emilyoreilly.co.uk/2021/10/31/new-projectThe conservation of the Naples bed hangings from Mount Stewart, National Trust, Northern Ireland
Have a look at this short film of me introducing my current project. Yes — they are made from paper.
]]>Emily O'ReillyLooking after and conserving family documents2021-02-07T13:18:16+00:002021-02-07T13:18:16+00:00http://emilyoreilly.co.uk/2021/02/07/looking-after-and-conserving-family-documentsThe stories told by a First World War soldier's demobilisation paper
This interesting piece of paper arrived in the studio in the autumn of 2020: a soldier's demobilisation account belonging to the father of the current owner — a father who said very little of his wartime life.
The document as it arrived into the studio
My brief was to repair the document and preserve it for the next generation. It is made from very fragile paper — soft, and torn along the folds — with the weak paper shedding fibres along the tears. Repairing would hold the paper together, consolidating the fibres and preventing more from detaching and being lost.
The paper was weakened and in places torn along the folds — note the fluffy paper fibres.
After a little surface cleaning I was able to press the document flat and repair the tears using toned tissue paper and wheat starch paste.
Toned, thin conservation tissue paper used to repair the weak folds of the document
The result is that the paper is now held together, and more of the writing is visible.
Before treatmentAfter treatment
Documents like these are a tangible link to family members, their lives and stories. I was amazed to see the term furlough used in 1918 — something I, like many others, had not come across until the events of 2020. It was also pointed out to me that there is a section concerning a charge of £1.00 for his greatcoat: soldiers were expected to return the coat to the nearest railway station after their return home, when their £1.00 would be reimbursed. Quite a lot of money at that time.
I love my job and the practical side of conservation treatments — but even more, I love the stories behind the objects I treat. The fascinating history and tales are there to be discovered and shared.
This document inspired the owner to write a short story based on the life of this soldier. With kind permission, I share it with you here.
He's at the back of the wave, washing the unwashed soldiers into the carriages. Private Fred Fletcher slams the compartment door behind him and clambers over the hillocks of backpacks and tin helmets, seeking a crevice. He's assailed at once by the pungent stink of closely confined soldiers. Sliding past Higgins, the squad bully boy, and into the corridor, he makes for a carriage door, and backs his frail frame against it, ignoring the mumbled protests of those he shoves aside. There's nowhere for his kitbag except between his feet, so he wedges it there. Once stable and warmed by the bodies around him, he re-lights a stub of Woodbine that he has been holding cupped in his hand. He stretches his neck and blows smoke through pursed lips at the ceiling. His taut shoulders relax as the nicotine wafts through him. He allows himself to drift off in the fug until there is a warning heat in his fingers. Turning, he tugs at the leather window strap and flings the stub out into the blackness.
"Close that bloody window, mate!"
He grunts an acknowledgement as he pulls up the window and secures the strap on its stud, then resumes his position with his back against the door, hands thrust deep in his greatcoat pockets. His fingers find and draw out a thin piece of paper, which he unfolds and reads. A derisive snort escapes him — his Soldier's Demobilization Account — five years of his miserable life reduced to two columns of figures.
"Stoppages and Payments," he sneers. "Greatcoat — one pound. What are they going to do with these rags? Save 'em for the next bloody war? Miserable buggers!"
"T..t…to ri.ri.ri.right, mate."
Fred turns, surprised, to the big sapper, whose body is pressed against his. For the first time, he sees the tremor in his hands and the twitch in his jaw — another one damaged forever by this madness. He looks down at himself, at the coat that hangs on him like a threadbare elephant skin. He will have to hand this in at a railway station if he wants to get his money back, but right now he is surprised by how reluctant he is to do this. There must still be lice in the seams — the familiar itch is coming back even though the coat and everything else was fumigated in Aldershot. But he feels safe inside it, and he needs its warmth. He was always thin, but since being injured, he's just a walking skeleton.
He gulps over and over again, trying to fight off memories and a panic attack. Every day for three years, whatever the weather, he wore this coat. When the gas got him, his greatcoat had clung to him as he sank down the side of a foxhole, coughing and gasping, eyes sore and oozing, waiting to die. He might have died, too, if it hadn't been for the little warmth provided by the coat. It kept him alive until he was dragged out under cover of darkness. Then there was the time he snagged his leg on barbed wire and it went nasty. Fever ravaged him for days, and he lay, shivering, against the trench wall wrapped in his coat. He shakes his head, trying to dislodge the images there. They shipped him back to the hospital in Blighty, but they didn't let him stay long. At least he landed a job as batman to the colonel when he returned to the front. It was worth a bit of bowing and scraping to keep out of the fighting.
His coat's pockets hold other treasures. He runs a finger along the smooth casing of his penknife, finding a ridge that opens the longer blade. A glimmer of a smile twitches his lips as he imagines his ma's reaction if she had seen him using that same blade to cut up his dinner and to dig out a bullet from a mate's leg. His other hand finds a coil of thin string. Civilians have no idea how valuable string can be when you have nothing else.
There is another piece of paper too, greasy and torn from constant re-reading — a short stiff letter from Dolly, the girl he hopes to marry. His mate, Dick, had brought his sister to see him when he was in hospital. Fred flinches as he remembers the disappointment in her eyes when she looked down at him — a feeble wreck of a man, who found it difficult to speak and almost impossible to smile. She had promised to write, but he had to wait nearly three months before the letter arrived. Perhaps he is just being a dreamer, but he needs a dream after what he has seen — and done. And she probably needs a husband. Men are in short supply.
"All out! Getta move on. It's Brummagem-on-Sea for you lucky boys."
A half-hearted cheer goes up. The train lurches backwards and forwards as it draws into New Street Station. Men fall over each other, eager to leave. Fred stumbles onto the platform, a stabbing pain from his wounded leg taking him by surprise. Then, tossing his kitbag over his shoulder, he starts the slow walk back home. There is little to look forward to. His mother and younger brother died from Spanish flu a few months ago. His brother, Jack, is so maimed that he will never be able to carry on in the music hall. The heart has gone out of the family. He stops, lights another Woodbine, draws his coat tight around him, and sets off again.
Private Fred Fletcher on his wedding day]]>Emily O'ReillyConserving a Poster2020-11-22T17:56:39+00:002020-11-22T17:56:39+00:00http://emilyoreilly.co.uk/2020/11/22/conserving-a-posterRepairing and lining a poster ready for framing
This poster arrived in my studio over the summer all folded up. It dated from the early 1960s and it had belonged to the owner’s grandfather. My client wanted to have it framed to display in his home office, a reminder of a much-loved family member.
The poster when it arrived at the studio
The creases were heavy and at the edges the weak paper had
torn. There were some edge tears and some small losses. As usual, I examined
the poster carefully, took photos and drew up a condition report and a
treatment proposal along with a quote for the client. The client accepted my
quote and I set to work.
First job — washing
Because the paper was so weak and discoloured the first thing I did was to immerse the poster in a bath of water. This helps to reduce the discolouration but also helps to improve the condition of the paper, preserving it for the future. It is also a good way to ease out the folds and creases. The first bath water was slightly yellow tinged so I knew it was worthwhile.
Poster immersed in a bath of water
Lining a poster
Because of all the tears and losses I decided to line the poster onto Japanese tissue. I could have individually repaired the tears, but, because there were so many and because the paper was still quite weak as it was poor quality it was easier and quicker to line it (or back it).
Brushing down the pasted tissue on to the back of the poster
As you can see working with the pasted thin paper is not for the faint hearted! I chose the lining paper specifically for this poster and had to use two pieces so the grain direction of the paper lined up with that of the poster.
Positioning the second sheet on to the poster
Flattening the poster
After lining, I allowed the poster to dry naturally, sitting on some blotters on the desk overnight. I then lightly misted the poster with water and taped the edges to a board.
The poster on its lining taped to a board with brown gummed paper tape
Those of you who have ever painted in watercolour might have
done this with your paper. By misting the paper it relaxes and expands it
slightly. While it is damp, taping around the outside with brown gummed paper
tape holds the paper as it dries and contracts keeping the paper flat. Carrying
this out with a lined poster, one needs to be careful not to over-expand it: on
drying, the paper may split, as restraining it puts the poster under such stress
that something has to give.
Repairing the poster
With the poster on the board it was then quite easy for me to repair the missing areas, the tears having already being repaired by the lining. I could also locally dampen the creases and gently press them with a heated spatula.
Crease before locally pressing
Crease after locally pressing
Before repair
After repair
Framing
All that was left was to trim the lining and the poster looked as good as new. Then I attached the poster to a support and box framed it.
The poster trimmed and ready to frame
Observant people may have wondered what was going on with the printed name and its white, patchy appearance. The name was obviously added to make a personalised keepsake out of the poster. When still wet from printing, it came into contact with another sheet of paper and the paper fibres attached themselves to the wet ink. Even after washing, the fibres did not reduce — so in consultation with the owner, we decided to leave them visible and in place: a history of the poster's creation and life.
Paper fibres adhered to the ink
I delivered the poster back to a delighted client last week. It is now in great condition and ready for its new life, proudly on display — a wonderful memento of a grandfather, ready to be passed on in time to his great-grandson, who shares his name.
]]>Emily O'ReillyCreases, folds, dents and seagulls2020-03-29T11:47:46+01:002020-03-29T11:47:46+01:00http://emilyoreilly.co.uk/2020/03/29/creases-folds-dents-and-seagullsCan you remove creases from contemporary prints?
Something that comes into the studio regularly is modern and contemporary prints that have suffered from creases, bashed corners, dents, and handling creases — or what I was taught to call them: seagulls. That annoying, V-shaped light crease on the paper or in the inked area. These occur due to poor handling, particularly when a print is lifted with one hand and not supported. The print droops under its own weight, kinking the paper right where your fingers are holding on to it.
Seagull in the inked area of a print, before and after conservation treatment:
Due to the flat, smooth finish, these creases really show up — casting a shadow and spoiling the look. Even more annoying when they are on the edges and you really want to float-mount the print within a frame and show the whole sheet.
Verso of a print showing a crease, before and after conservation treatment.
But, fear not.
Something can be done. With gentle humidification and a press, these creases can disappear almost completely. If they're a little persistent, local humidification and pressing with a heated spatula can also help. But where there is any relief on the print, or a blind stamp, care needs to be taken not to over-humidify and over-press — these really need to be kept.
Crease near the title of a print, before and after conservation treatment:
But why do you humidify, Emily? Surely that flies in the face of keeping my collection dry?
Paper has a memory. If you have something rolled, or with a crease in it, putting a heavy weight on it will not solve the problem. A little moisture or humidification helps to relax the paper fibres so they're more willing to stay where you want them.
Dent in the paper of a print, before and after conservation treatment:
As with any conservation treatment, things can go wrong if you don't know what you're doing. You need to know what type of print process and paper you're dealing with — and how long to humidify, and how wet to get the paper.
Annoying crease on the edge of a print, before and after conservation treatment:
Sometimes creases can't be removed completely, but most of the time I can reduce them enough that they become unnoticeable — and most importantly, no longer annoying.
Crease at the corner of a print, before and after conservation treatment:
Ta-dah.
The finishing touch is getting them framed — showing them in all their glory. And I can help you with that.
But that can wait for the next post.
]]>Emily O'ReillyEmergency recovery after a disaster2019-10-03T15:44:01+01:002019-10-03T15:44:01+01:00http://emilyoreilly.co.uk/2019/10/03/emergency-recovery-after-a-disasterWhat to do in an emergency if you spill something on a work of art on paper
Last week I had a phone call from a distressed client who had managed to spill a glass of water over a beloved framed map. Water had got into the frame and was creeping up the map. Fortunately I was free; I encouraged her not to attempt to remove the map from the frame, and to bring it to my studio that very evening. Speed was of the essence.
Water stains on paper
The map was framed unusually, between two sheets of old glass with the glass pinned into the frame, so it needed to be carefully taken apart before the map could be extracted. Another problem I may have encountered was the map being stuck to the glass — this often happens, so I was very careful to check it was not the case. Thankfully it was not.
Dirty paper and water
Dirty paper and water do not bode well. The water had crept up the map and, with it, had drawn the soluble dirt and discolouration that was in the paper. There was an obvious tideline of dirt around the water stain. If this had been allowed to dry, there was a danger it might never be removed — so I had to act quickly while the paper was still damp.
Hand-colouring on old maps
The main concern for me was the watercolour hand-colouring on the map. It was obviously old, but also very thickly applied. If the water stain had spread, it may have solubilised and caused the paint to run. It also meant that the best treatment I could use might cause it to run, or even wash it away. I tested the watercolour and indeed found it to be quite sensitive to water.
Washing a similar map on the surface of water
Washing away the stains
So how did I remove the water stains from the paper, and not the watercolour? I carefully floated the map on the surface of a bath of water — but please don't try this at home. It took some time and kept me busy on a Friday night (and away from my usual glass of wine). The bath water became very yellow as the dirt and discolouration was drawn out of the paper by capillary action. The next morning, after it had dried, the stains had gone and the whole sheet of paper was looking less yellow — and more importantly, the watercolour remained intact.
Before treatmentAfter treatment
So, what should you do if you spill something on a work of art on paper?
In the words of Captain Mainwaring — don't panic. Call a paper conservator.
]]>Emily O'ReillyI’m on BBC Radio Wales2019-09-25T09:33:06+01:002019-09-25T09:33:06+01:00http://emilyoreilly.co.uk/2019/09/25/im-on-bbc-radioI was interviewed back in the summer for BBC Radio Wales' Science Café, and it was first aired on Tuesday 24 September 2019. You can listen again here.
Rachel Howells and I were interviewed at the BBC studios in Cardiff by Adam Walton; Phil Parkes from the University of Cardiff was also interviewed. It's a fascinating programme (if I do say so myself) and a good introduction to the world of colour and what it means in conservation.
]]>Emily O'ReillyThe Importance of Labels2019-03-04T12:55:47+00:002019-03-04T12:55:47+00:00http://emilyoreilly.co.uk/2019/03/04/labels-on-the-back-of-picture-framesWe have all seen them — but what should we do with them?
Label pasted onto the glass of a frame
Framer's label pasted onto the backboard of a frame, before treatment
I recently worked on a project of ten framed 18th-century prints. I was pleasantly surprised and pleased when my client asked me to treat the labels on the back of the frames as well as the prints themselves. The prints had obviously been framed in the latter half of the 19th century, and my client had done some research on the framers' labels to support this. She was very keen to keep this connection with the past, and I was delighted to be able to.
Having worked in a museum, treating labels would have been something I'd do automatically. But in the world of private practice, time is money, and not everybody appreciates how important labels are in dating, authenticating, or adding provenance to an art work.
The treated labels pasted on to stretched Japanese paper to dry
So what did I do?
I carefully removed each label with water, washed them in a bath of water, and lined them onto Japanese paper. I then re-attached them to the back of the frame, exactly where I had found them. Simples.
The dry-lined label, cut from its lining ready to paste back on to the frame
Not every conservator would treat labels as I have done. In museums or collections they are sometimes put 'on file' — kept, but disassociated from their work of art. Sometimes the labels are not treated at all. This is not always a good idea: in most cases, labels are not made with good-quality paper and so are inherently susceptible to damage. They tear easily, break, and are lost. Washing and lining helps to preserve them that little bit longer. I'm not saying they'll last forever — but they'll certainly last longer than if not treated at all.